


tripleclimax
-
Posts
3 -
Joined
-
Last visited
About tripleclimax

tripleclimax's Achievements
")
Newbie (1/14)
0
Reputation
-
I am currently using the "One HUD" mod which is great but I am looking for a way to remove the brackets around hit points / action points. I searched on Nexus and Google but didn't find anything even mentioning this particular option.
-
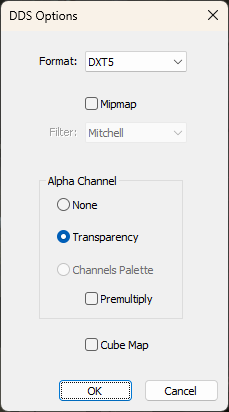
@Pagafyr I read the same suggestion in the comments of a recent YT video I watched but was skeptical. So I changed the file extension from the resized .PNG to .DDS and did actually load and display the new texture. In fact, you can rename the original Fallout texture to .PNG, upscale it and change it back to .DDS. Skipping the conversion altogether. Although if you skip the conversion to .PNG you have either no image preview in the upscale tool or it's displayed weirdly distorted / stretched. Also when loading the new .DDS into Photoshop while using the "NVIDIA Texture Tools Exporter" plugin it gives me an error and fails to load. I noticed a weird lighting issue in game as well where the "Pipboy 3000" text on the Pipboy texture was displayed double in a specific angle after just renaming the file to .DDS again. @JimboUK I don't know what a color or diffuse map is, so I can't really use that information. As I said, I am new to everything related to modding. Here is what I tired tho, and it seems to work: - I don't use Upscayl anymore, I switched to Topaz Photo AI which has a plugin for Photoshop - Open any Fallout 3 texture in Photoshop - Resize with Topaz Photo AI - Save a new copy of the resized image using fnord DDS Plugin See the image for settings I used, I hope that's correct. The test texture I used is the Pipboy 3000 in "Data\textures\pipboy3000\pc\english". The file is about 4mb at 2048x2048. You Select "File / Automate" in Photoshop, then resize via the Topaz plugin. Once it comes back into Photoshop there are 2 layers, the default one (when you open the original .DDS file) which is a locked layer and the resized one which is unlocked. I delete the original locked layer and keep the resized one. Only then it gives me the Alpha Chanel options in the export dialogue. You are probably right, I think if I continue I will stick to 2k and limit the scope to weapons and base textures, excluding things like NPCs. @MuteSignals I try to stick to Photoshop whenever possible but when everything fails I give it a try. Oddly enough it's also the tool of choice in this tutorial: https://tw-modding.com/wiki/Tutorial:Upscale_texture_using_ai Unfortunately Paint.net doesn't support batch processing so it has to be done via AutoHotKey.
-
I don't like graphical mods that affect the original art style so I am currently trying to upscale the original vanilla Fallout 3 textures to 2k/4k. Here is my workflow so far: - Extract textures with BSA Browser (https://www.nexusmods.com/skyrimspecialedition/mods/1756) - Use DDS Converter to convert textures to .PNG (https://ddsconverter.com/) - Upscale the textures to 2k/4k with Upscayl (https://upscayl.org/) Now the next step would be converting the files from .PNG back to .DDS and this where I don't know how to proceed. I neither know the correct format or right tool to accomplish this task. I heard about GIMP, Paint.net and Photoshop. There's 12.280 textures in "Fallout - Textures.bsa" so batch processing is mandatory. I do own Photoshop and know two Plugins that let you open and save .DDS files: - https://fnordware.blogspot.com/2014/09/dds-plug-in-for-after-effects-and.html - https://developer.nvidia.com/texture-tools-exporter As mentioned, I don't know what to use and what the correct settings should be. I am completely new to FO3 modding so any help is appreciated.