domi29
-
Posts
3 -
Joined
-
Last visited
About domi29

domi29's Achievements
")
Newbie (1/14)
1
Reputation
-
A Guide to Game Pass Modding (No Mod Manager)
domi29 replied to domi29's topic in Starfield's Discussion
I'm so happy I could help! -
A Guide to Game Pass Modding (No Mod Manager)
domi29 replied to domi29's topic in Starfield's Discussion
I'm also not sure if the Address library is required for the mods I have currently installed. I included it in the guide to cover mod types that I don't use as it will not be accessed by the game directly unless a mod looks for it. DLL mods for instance would look for that file. -
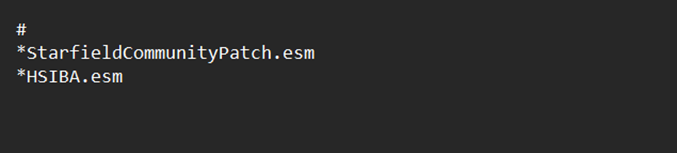
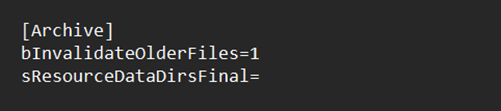
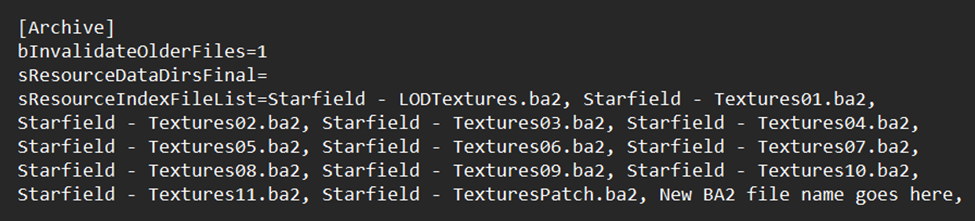
A Guide to Game Pass Modding (No Mod Manager) The primary goal of this page is to set the record straight (or at least firmly crooked) on how to install all the great mods found on the Nexus into the Game Pass version of Starfield. Hopefully this guide will curb all the hiccups and wondering if it’s done right. If you have previously used the sTest file method to install .ESM mods, you will need to remove those entries from your StarfieldCustom.ini completely before beginning. Mixing the two methods is not optimal, and not needed if the mod is installed correctly as described below. Getting ready 1. Download the following required files: · Ultimate-ASI-Loader (direct download) · Plugins.txt Enabler · Address Library for SFSE Plugins · A mod of your choosing 2. Download the following optional file: · Starfield Achievement Enabler (Allows you to still earn achievements, and also removes the modded game warning popup). 3. Unpack all files to a convenient location (My personal preference is a created folder named SF Mods). 4. Create the following documents in notepad: · Plugins.txt file (example below) Be sure the # and * are included as shown. The esm name should be copied directly from the mod. · StarfieldCustom.ini file (example below) Where to put your unpacked files Most of your downloads are not going to include instructions on where to place the different files of a mod. The following list should guide you in sorting those out. My personal installation has separate drive locations for the main game files and the add on files. Your drive letters may be different, but the overall path should be the same unless you have modified them. C:\Users\YourUserName\Documents\My Games\Starfield · StarfieldCustom.ini C:\Users\YourUserName\AppData\Local\Starfield (To find this, make hidden files visible in Windows and Unhide extensions for known file types.) · Plugins.txt C:\Users\YourUserName\Documents\My Games\Starfield\Data · Geometries, Interface, Meshes, and Textures Folders (Folders may need to be created if not used previously) D:\XboxGames\Starfield\Content (You should see Starfield.exe in this folder) · bink2w64.dll (Rename the original file to bink2w64Hooked.dll) · SFPluginsTxtEnabler.asi (Also any other .asi files you may use go here) · vcruntime140_1.dll D:\XboxGames\Starfield\Content\Data · ModName.esm files · ModName.esp files (not recommended to use these types of files) · .ba2 files [the .ba2 name will need to be added to the [Archive] section of your StarfieldCustom.ini after this entry: Starfield – TexturesPatch.ba2, (see example below)]. D:\XboxGames\Starfield\Content\Data\SFSE\Plugins (this folder will most likely need to be user created). · versionlib-1-8-88-0-1.bin (Use only one file, typically the one with the highest number). D:\XboxGames\Starfield\Content\Data\Strings · .strings file extensions (multiple variations). D:\XboxGames\Starfield\Content\Data\Scripts · .pex files · Source folder for .pex files D:\XboxGames\Starfield\Content\Data\Scripts\Fragments · Additional .pex files that are included in a mods Fragment folder structure. Creating a startup bat in place of Console Command Runner: Create or edit the following line in your StarfieldCustom.ini (see above for placement): [General] sStartingConsoleCommand=bat Merged In [ D:\XboxGames\Starfield\Content ] place the bat(s) you would like to run at startup. Create a new text document and name it Merged.txt and place in the same folder. Within that new file, list the bat files (without the extensions) you want to run at startup like this: bat LockpickCheat bat InstantScan bat CloserFollowOn bat StopStaring bat shipsize bat IncreasedSpaceLootDistance bat FlightCamera bat moreDockingDistanceInSpace All bat files listed in Merged.bat will now run at game start. In situations such as passing through the Unity or starting a new save from a currently running game, you can either open the console and type bat Merged, or restart from desktop. *I don't recommend placing inventory item bats in this list as it will add new items every time the game starts. That should cover the majority of the mod types that I have personally found on the Nexus. Additional input is always welcome!