robotized
-
Posts
416 -
Joined
-
Last visited
Everything posted by robotized
-
I don't know how useful this is going to be in your case and I haven't tried it myself, but I'm gonna throw it out there as an option - Replace Any Actor with Any Actor by mod author SKK.
-
How do I fix these bugged flashlights on a weapon?
robotized replied to leotheEliteMajor117's topic in Fallout 4's Discussion
Hm, so it's not from the light. There's one thing that comes to mind. You have to check it in the nif of the flashlight. Here is an example from the T60 headlamp: Check the BSValueNode and the parent NiNode(which contains the BSValueNode, in this example it's the AddOnHelper). If the scale is < 1 (like 0,90 or less), this could be a cause to somewhat similar effect in the game. Although if scale has been used, must be on purpose, probably to make the glow meshes smaller to fit to the mesh of the flashlight.
-
How do I fix these bugged flashlights on a weapon?
robotized replied to leotheEliteMajor117's topic in Fallout 4's Discussion
Yes, I think this comes from the light. Can be changed in FO4Edit. If the weapon is using custom light, when you open the plugin, there should be Light category. You'll find the lights there. Select the light and then right click on the Flags(sorted), like this: A new window will appear. For the light of the weapon, it is probably set to Shadow Spotlight. I'm guessing the source of the light is close to some other parts of the gun and that's why it is projecting shadows. You have to disable Shadow Spotlight and enable NonShadow Spotlight. Don't touch other flags. If there are other light colors, you have to do the same for them as well. Exit and confirm the changes to the plugin.
-
How to add partial transparency effect to any static object ?
robotized replied to Sven363's topic in Fallout 4's Discussion
To make object more glossy, open the BGSM and try with increasing the specular multiplier. Or you can edit the specular map, try with increasing its brightness. Specular maps should be saved with BC5/ATI2 compression method(or BC5 linear unsigned in paint.net). In paint.net add new layer to the diffuse map. Arrange the layers so diffuse map is first(above) and the new transparent layer is second (below). Select the layer with your texture(diffuse map) and from the menus open the layer properties. Reduce the layer opacity. Then from the menus again you merge the layer down(or flatten image). For transparency it's necessary to edit only the diffuse map. No reason to make normal and specular transparent. I wanted to show it better with screenshots, but I'm not in front of my PC right now, sorry. -
How to add partial transparency effect to any static object ?
robotized replied to Sven363's topic in Fallout 4's Discussion
Add NiAlphaProperty to the BSTriShape of your custom object and set the flags like this: You can either do it like shown(right click + flags), or double click on the number and enter 4333. After that, for the material of the object, change these options: Then to change transparency you have two options - edit part of or the whole texture(diffuse map); from the material file reduce/lower Alpha(you can see it above the Alpha Blend Mode). This example is for objects with BGSM material. If you decide to edit the texture, you have to save it with BC3/DXT5 compression or BC7(these compression methods include alpha channel). Edit: If the object is part of precombines, you won't see any changes to it in the game(from the edits to the nif), until you re-build the precombine geometry and precombine visibility for the cell(or cluster of cells) where the object belongs. I am mentioning this because you wrote in the title "any static object" and static objects are usually part of precombines. Such is the case for vanilla static objects.

-
I got a couple of tutorials, I wouldn't call them best and they are aimed at specific topics. How To - Add Headlamps To Helmets How To - Add Pulsing Glow To Armor For creating glowmaps, the one mentioned in the above posts is very useful.
-
Everyone is red it is annoying
robotized replied to ThatOneOddSymbioteCosmo's topic in Fallout 4's Discussion
I also think what showler said, could be the case. I'm sorry, I haven't encountered this bug, I don't know a solution. I do have advice for the size of screenshots, if you are on Windows. You can use good old Paint to open the screenshot PNG. You can do two things - resize to smaller resolution(in case you are using something like 1920x1080) and save the file as a JPEG. Try only one, or combine both for the smallest file size. -
I have an old mod called Rad Ring - you can craft a ring, which constantly gives you +1 rad/sec damage while equipped. The radiation damage can be countered by resistance, damage shown is <1rad. Check it out, see if this could be of use to you. If you want to have rad damage, without equipping the item, then I guess you have to add a spell(or perk+spell) to the PC. The perk/spell should have condition to check if the character has the item in inventory. Perk/Spell can be added to PC via a Quest, but you may need a script for that, I'm not entirely sure about it.
-
Is there an in depth guide to the Material Editor?
robotized replied to Crash180's topic in Fallout 4's Discussion
Try lowering the scale to reduce the effect from the cube map. If using BGSM, the specular map could be considered envmap mask - more smooth and shiny surface will be more reflective. So if lowering the mask scale doesn't work for you, leave it as it was and try lowering the Specular Multiplier. But I'm thinking it should have the same result, and is recommended if using separate custom material, only for the glass. Otherwise you will lose the effect of the specular on the rest of the mesh. I'm guessing last resort is editing the specular map itself. -
Is there an in depth guide to the Material Editor?
robotized replied to Crash180's topic in Fallout 4's Discussion
Non Occluder doesn't make an object see-through, but rather tells the game that this object is see-through, that's the best way I can explain it. If you are going to build precombined geometry and visibility for a cell and don't enable this setting for your window's material, then you'll get broken visibility when you look through this window. You need more transparency. By Alpha, do you mean in the BGEM? If so, raising it makes the texture more opaque. You should lower it - like 0.8 or 0.7 and so on. Or make texture more transparent. Does your BSTrishape have a NiAlphaProperty? Usually these are the flags/settings in the alpha property used for alpha blending: Edit: I must have forgotten my glasses . You DO want to make the glass opaque. In this case what pepperman35 said below, you could use BSLightingShaderProperty instead. -
Is there an in depth guide to the Material Editor?
robotized replied to Crash180's topic in Fallout 4's Discussion
I know about some of the settings. BGEMs are used for various effects, for glass or also can be used for glow. I'll start with the General settings tab. Offset/Scale UV - these are regarding the unwrapped vertices. You should rather make these kind of edits in Outfit Studio, NifSkope or other program. You don't have any kind of "preview" here and you won't know what changes until you see it in the game. Alpha - default 1. Reduce for more transparency or increase for more opaqueness, without editing the texture. Alpha Blend Mode - Standard is usually when you have alpha blending(semi-transparency). You should also have Alpha Property added to the BSTriShape in the nif(with appropriate settings/flags). Additive and Multiplicative are used in specific cases. Bethesda used Additive, when they did the glow for the Construction Protectron rotating light(Materials/Actors/CreateABot/ProtectronConstructionGlow.BGEM). They used Multiplicative for the chameleon deathclaw(Materials/Actors/Deathclaw/DeathclawChemeleonBlue.BGEM). Z Buffer Test - must be always on, otherwise you have loss of depth. Screen Space Reflections - I think it's used mostly for glass, if you have real time reflections enabled in an ENB or something. Decal - this is rather for BGSMs, when you have alpha blending. Use with Standard blend mode. Two Sided - self explanatory, you see the texture from both sides of the mesh, otherwise the back side will be invisible. Non Occluder - used for glass or other objects, through which you can see what's behind. Must be on if the object will be part of the precombines. Environment Mapping - used to create fake reflections for glass, puddles and so on. Environment Mask Scale - for controlling the reflections, if you want more or less reflective surface. Now on to the Effect tab. Base Texture - could be in color or could be gray. Grayscale Texture - here you put path for a color gradient. If Base texture is gray, you can use the grad to color it. Again for example you can refer to the chameleon deathclaw. I see for this purpose Bethesda enabled two more settings Grayscale to Palette Color(from General) and Grayscale to Palette Alpha(from Effect). Envmap Texture - path for cubemap. Must have this texture path if you enable Environment Mapping. Fake reflections come from this texture. Normal Texture - I think this works only if you use Environment Mapping. Bumps and cracks or whatever are mostly seen when you have reflections. Envmap Mask Texture - I think this has similar purpose as the glow map for the BGSM. The texture is in black and white, the parts in black do not receive reflections. Effect Lighting - not sure the exact purpose for this, but I think glass looks better with it. With this option enabled, glass changes during day and night time. If this is disabled or reduced via Lighting Influence(further below in the settings), the glass will stick out like sore thumb and even look like it's glowing at night. For glass I suggest to enable it, but reduce influence slightly, like 0.9 or 0.8. Base Color - default is white. It has influence on the base texture. You can color the Base texture if it's gray. This could also be used for emittance/glow. Base Color Scale - how much the color has influence on the Base texture or how strong is the glow. Falloff - I don't know what this setting does, Bethesda used it in some BGEM files, including for the glow of the Construction Protectron. This and anything else not mentioned, I don't know their purpose. And hopefully I'm not (too) wrong about the other settings I described above. -
I haven't tried addon nodes on component before. Didn't seem like something that would crash the game. So I became curious. You are welcome.
-
I don't know. Download the attached file and compare it with yours. I added BSValueNode, gave it a name, changed the Value to 420 and enabled Addon in the BSX flags.
-
No crashes for me. I transferred nuclear material from workshop workbench to my inventory, then opened the pip-boy and dropped 1 piece on the ground. It was emitting green light. Component_Nuclear.nif

-
LooksMenu Overlay Categories, possible? Not? Already done?
robotized replied to AnonyGirl's topic in Fallout 4's Discussion
I think the Sort option inside overlays.json can be used across mods. Lets say you have mod A, B and C with overlays. You want overlays from C to appear first in the list, then from mod A and finally mod B. You start by opening overlays.json of mod C. Find the very first overlay and copy "sort": 0 . Use Replace function of the text editor and replace all with "sort": 1 . Do the same for the overlays.json of mod A and B, but use "sort": 2 and "sort": 3 respectively. This is applicable when every overlay in the json uses same sort number, which is the case most of the time. -
Haven't tested, but if it's possible to use Better Console together with Highlight Console Reference, you'll know when you've selected the object in question.
-
Can't tell you anything on creating collision. If objects and bullets go through, then the part where the glass was did not have collision to begin with. If you want this part of the door to have collision, use the nif of a similar door, which doesn't have glass - for example PaintedWoodDoor01.nif. Put the BSTriShape of your edited door there instead. Some doors have door knob animations as well. And if you are making a workshop door, make sure you use the nif of one, because it contains connect points for snapping the doors in place.
-
If editing in Blender is messing with nif structure, then use original nif. From edited nif copy branch on the BSTriShape of the door and paste it in the original. Then save the original with different name - this will be your custom door. Nif of doors have animations - sequences for opening /closing of the door. BSTriShape of the door must go under the NiNode that is animated. I'm not sure how important this is, but I'm guessing if you copy a new BSTriShape and remove the existing one, you have to make appropriate changes to the NiDefaultAVObjectPalette. The name is entered manually, for AVObject you enter the number, which is in front of the BSTriShape. I'm by no means an expert in this kind of editing, so hopefully I'm not wrong about these things. Also for simple edits, maybe you can consider using Outfit Studio, because I think it doesn't mess with the nif structure. Like if you want to remove vertices from a mesh. Speaking of, when removing part of the mesh, it leaves a hole, but the collision is still there so in the game bullets will not go through. In NifSkope you can assign new material to the BSTriShape and edit the UV if necessary.


-
Hello again When you export a nif with physics, OS should warn you about it and show a small window with a message: In this window, below the text is the path of the model itself. You just have to put a tick in the small checkbox in front of the file path, in order to select it and then confirm with pressing OK.
-
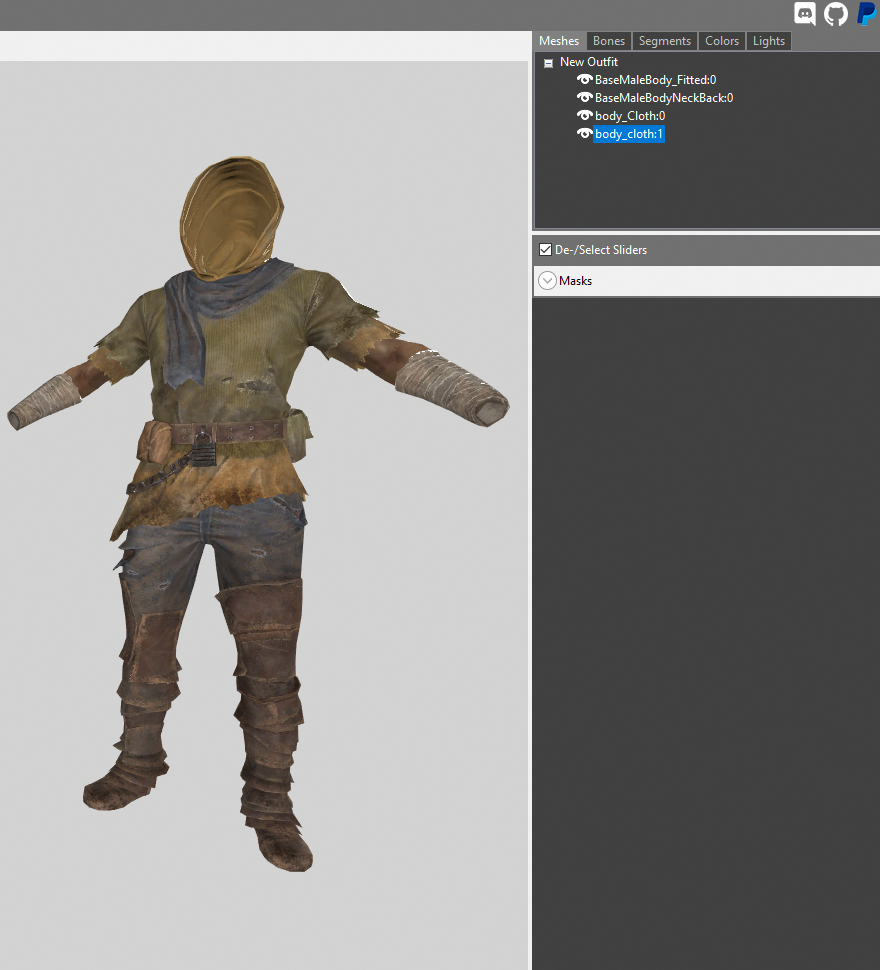
How do I make the Hooded Rags Hoodless?
robotized replied to JakR4t's topic in Fallout 4's Discussion
You are welcome and best of luck. -
How do I make the Hooded Rags Hoodless?
robotized replied to JakR4t's topic in Fallout 4's Discussion
No problem. Btw you were referring to this outfit, right? If yes, the hood is actually a separate mesh inside the nif(body_cloth:1). You can select it and press Delete and it will be gone without too much hassle. Then export the nif. Well, unless you are editing a CBBE version of the female outfit, it's a bit different there. You should watch some videos then, on how to open, edit and save body slide files. If you want the cap gone as well, this job is done in a plugin with an override of the Hooded Rags armor - remove the AAClothesResident6Hat [ARMA:0019DB8E] armor addon from the Models and disable Hair Top and Hair Long biped slots.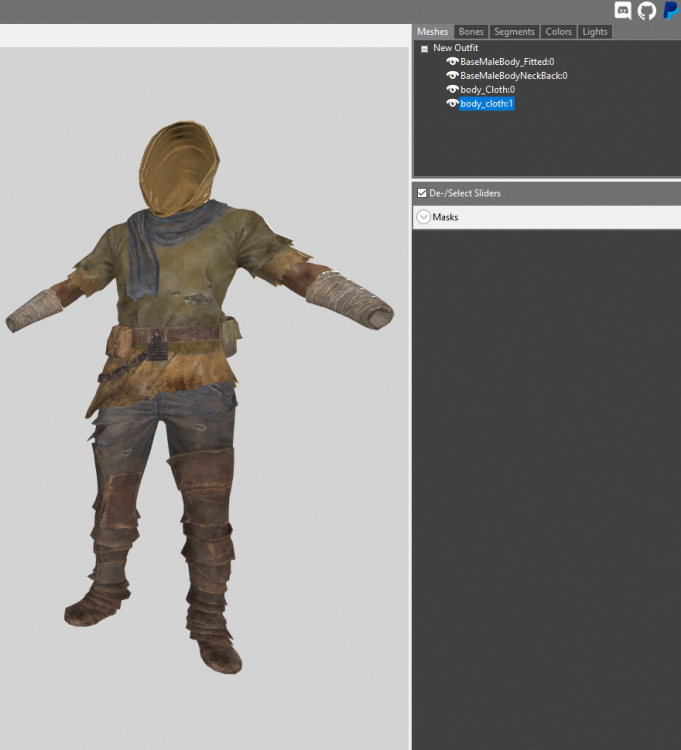
-
How do I make the Hooded Rags Hoodless?
robotized replied to JakR4t's topic in Fallout 4's Discussion
You are welcome. If the hood has separate mesh and its own texture, then it has its own material too. Open the material(BGSM) with Material Editor and reduce Alpha from 1 to 0. This will definitely make the mesh invisible. I did a quick test, it's working and is not required to add alpha property. -
How do I make the Hooded Rags Hoodless?
robotized replied to JakR4t's topic in Fallout 4's Discussion
If the hood is a separate mesh, check what material it uses. If it's the same as the rest of the outfit, then assign new material. For the new material try with Alpha set to 0. I'm not sure if it's required to have alpha property for the tri mesh in the nif. If the hood is part of the outfit, there are two things you can do. First, just delete the hood from the mesh. In Outfit Studio use masking on the hood, then invert mask and delete vertices. Or second, add alpha property for the tri shape(mesh) of the outfit. Open material and enable Alpha Test. Edit the texture and delete the part with the hood. Make sure the texture has alpha channel, I think when you delete something, the background should be transparent. Save the texture with BC3/DXT5 compression and enabled mipmaps. Setting for Alpha Test Reference in the material could have influence on the transparency. Note: Some operations are done in NifSkope, like adding alpha property to a mesh. -
Need female body texture overlays for LooksMenu
robotized replied to AnAtheistBear's topic in Fallout 4's Discussion
When you said "distribute", I hope I didn't misunderstand something. My mod does not distribute overlays, it is meant for applying the overlays yourself, to PC and companions. If you are asking about mods with EVB female textures, I know about a few. 4K HD EVB Skins - just upscaled EVB textures. NUCLEAR Nude (Enhanced Nude) Katrin EVB and CBBE WEARABLE body underwears - same author also has Enhanced Nevernude mod. EVB Refreshment - 4K Skin Texture for EVB - Mesh Seam Fixes and Dismemberment Valkyr Female Face and Body Textures - this is for vanilla body, I'm guessing it will work on a nevernude EVB body. Edit: The Wandering Scavver- Face and Body Textures VANILLA EVB CBBE - there are a two options for vanilla nevernude body, which means it should work with nevernude EVB as well. -
Need female body texture overlays for LooksMenu
robotized replied to AnAtheistBear's topic in Fallout 4's Discussion
One of my earlier mods can be considered sort of a framework, to apply body textures as overlays. This means you have to download skin mods, extract the necessary textures from their archives and put them in the appropriate folders. To use the overlays you need Main file + Update 1.4 + JSON fix. https://www.nexusmods.com/fallout4/mods/43165?tab=description Of course overlays are not meant for body textures. They have their own little quirks, but they don't require a body source and are "persistent" (compared to the skin overrides).