scorrp10
-
Posts
1354 -
Joined
-
Last visited
-
Days Won
15
Everything posted by scorrp10
-
Best way to test mods is to learn how to MAKE mods - that is, at least learn the mod tools. You can then load a mod in CK or XEdit and just look at all the extras it adds. You can go into meshes section of a mod and examine the models it includes with NifScope. Doing a playthrough to try out a mod? You can use console commands to change your level, skills, perks, spells, etc. Or can write a script that will read a .json file and set your character up as needed, in seconds. Can even mark certain quests/quest lines as complete, change certain NPC dispositions, and so on. Grinding enchanting? player.setav enchanting 100 Not enough gold to buy that player house you want to review? player.additem f 100000 Reviewing some armor mod? use AddItem or its variant to just spawn in the needed items. Nobody in their right mind 'grinds it out'.
-
Papyrus Function to add Custom NPC to faction
scorrp10 replied to Skybroom's topic in Skyrim's Skyrim LE
If you have a quest with dialog for this NPC, you should have that NPC as an alias in that quest. And you likely already have a QF_ script for this quest with all the aliases as properties. For example, I have a quest named LilyRescue, and its fragment script is QF_LilyRescue, and it has: ReferenceAlias Property Alias_Player Auto ReferenceAlias Property Alias_Lily Auto and also: Faction Property PlayerFaction Auto Faction Property PotentialFollowerFaction Auto Faction Property CaptiveFaction Auto And in this script, I have this function: Function MakeLilyFollower() Actor LilyRef = Alias_Lily.GetActorRef() Actor PlayerRef = Alias_Player.GetActorRef() If(LilyRef.GetRelationshipRank(PlayerRef) < 2) LilyRef.SetRelationshipRank(PlayerRef, 2) LilyRef.SetFactionRank(PlayerFaction, 0) LilyRef.SetFactionRank(PotentialFollowerFaction, 0) LilyRef.RemoveFromFaction(CaptiveFaction) EndIf EndFunction So, in a dialogue topic, the fragment code looks like this: (GetOwningQuest() as QF_LilyRescue).MakeLilyFollower() -
SKSEVR gives me the same error every time
scorrp10 replied to Skayrimplayerjoshch's topic in Skyrim's Skyrim VR and Consoles
You need Address Library VR -
New Modder Tips for Skyrim VR?
scorrp10 replied to vr4life76's topic in Skyrim's Skyrim VR and Consoles
A bit late to the party, but for what's it worth... I personally use Vortex, works well for me. Though I use Valve Index. Skyrim VR is essentially a version of Skyrim SE, so most SE mods will work for it. But if a given mod has a VR version in its files, use that. You definitely should get the basics first: SKSEVR, AddressLibrary VR, Skyrim VR Tools, likely PapyrusUtil VR (in the misc files), SkyUI VR, and so on. One thing to keep in mind - Skyrim VR does not support 'light' mods, so you are limited to a total of 250 mods. You can install and use light mods, but they will each use up a slot. Although supposedly, this mod fixes that. -
Item invisible in game
scorrp10 replied to GoldenDragyn's topic in Skyrim's Creation Kit and Modders
Generally, after exporting to .obj, editing it in Blender and then exporting it from there to obj. In Outfit Studio, you should import an .obj into a project with a reference. I.e. load up the original .nif and set its mesh as reference - or load a reference body, such as CBBE. Once .obj is imported, you need to go into its properties and set 'skinned' flag in its geometry. Then you copy properties from the original .nif mesh to transfer textures and other parameters. You need to do bone weights on the imported mesh. Typically you can just set the original .nif as reference and use 'Copy bone weights'. You need to make sure that imported mesh is set to the same partition as original one. You need to conform the sliders on the imported mesh (if the original was a BodySlide project) You export the imported mesh as a .nif. You open the original and the new edited exported .nif in NifScope side by side, and compare them. If any section of the mesh had a transparency, it likely got lost - look for any meshes in the original that have a 'NiAlphaProperty' - it will need to be copied to the new mesh. In the BSLightingShaderProperty of every mesh, compare the Shader Flags 1 and 2 between original and edited. There are some flags that Outfit Studio does not copy properly. -
Why do so many people prefer to play in third person?
scorrp10 replied to InDarkestNight's topic in Skyrim's Skyrim SE
Skyrim is not really designed for 3rd, tbough there are some targeting mods that make using 3rd easier. Elder Scrolls Online is designed for 3rd. I mostly play Skyrim in 1st, but if needed, 3rd is only a flick mousewheel away. -
If the problem is getting the file, I keep a copy on my Google Drive https://drive.google.com/file/d/1hTxkmyvlNH8ZZsi6ez_LySlDE-iDpoht/view?usp=drivesdk
-
Remember that HeelsFix is just a correction mod. It adjusts actor position when riding, swimming or using furniture/markers. It does absolutely NOTHING for an actor that is just standing/walking around. And it looks like, when the game is under a bit of load, rendering of wearable transforms gets the short straw. Here is the quick demonstration of the issue. On my PC, this tends to happen when a new game is initializing, but on less capable PCs, it can easily happen when transitioning to another area. In particular, when one uses a follower outfit manager, this can cause NPCs to equip different gear after cell transition, causing them to lose heel offset. Note that this is all happening with HeelsFix 100% disabled.
-
Why are creatures from mods always so strong?
scorrp10 replied to InDarkestNight's topic in Skyrim's Skyrim SE
There are tons of mods in Skyrim that rework player's power curve by messing with armors, weapons, perks, followers etc. Chances are that author of SIC balanced the 'default' settings of their mod to cater to their own play style/favorite mod layout. And also likely balanced it around level 30 as well. Then, it is up to player to use mod's settings to adjust the difficulty. -
Game broke and I feel like I'm missing something.
scorrp10 replied to TunnelRhino's topic in Skyrim's Skyrim SE
If you only had like 20 mods, it really should not be an issue. I will assume that you get the game via Steam. In general, when the game gets updated via Steam, this is what you do: Go into your game's folder (most commonly, C:\Program Files (x86)\Steam\steamapps\common\Skyrim Special Edition) and delete any files starting with 'skse'. Go into Data folder and delete everything in there, except for .bsa files starting with 'Skyrim' You right click the game in Steam library, click Properties - Installed Files - Verify integrity of game files. Also, while there, in Updates section, set Automatic Updates to "Only update this game when I launch it" Once that is done, you launch the game via Steam, which takes you through Settings popup. See if you can get the game to start and actually play. Next, you go to https://skse.silverlock.org/, and download the build 2.2.6 (one for version 1.6.1170), unpack it, and copy its contents into your game's folder. Next, you should be launching the game through your mod manager - which should be starting it using SKSE. -
Packaging textures/meshes for standalone follower mod
scorrp10 replied to PenitentExile's topic in Skyrim's Skyrim SE
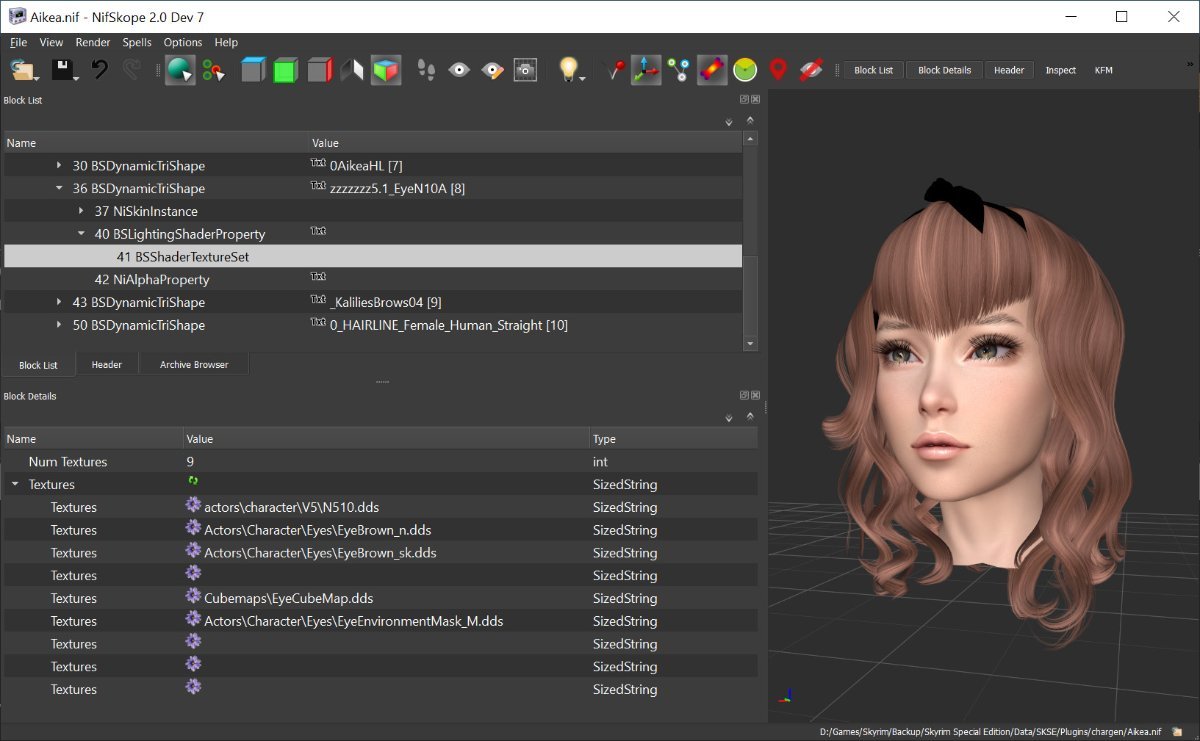
When it comes to game resources, including textures, they fall in several categories. Game's own vanilla resources which are in .bsa files. Mod improved resources that overload vanilla and are in .bsa files Mod improved resources that overload vanilla as loose files Mod add-on resources that are in .bsa Mod add-on resources that are loose files. Also, specific resources go into their specific subfolders under Data, and paths are relative to those subfolders. I.e. if the nif file specifies Actors\Character\Eyes\EyeBrown_n.dds, you should be looking for 'Actors' not under Data, but under Data\textures. How do I organize things for myself: I have a directory: D:\Skyrim\Vanilla\Data where I have unpacked various Skyrim's own vanilla .bsa archives. I also have a directory: D:\Skyrim\Mods\Data where I unpack .bsa files that came with mods. Then, in NifScope Resources tab in the Settings, I set the Data folder under SSE directory as primary - which will pick up any loose file textures - followed by Mods\Data, followed by Vanilla\Data. This assures that I get no missing textures in NifScope. When a .nif references a certain texture, I look for that texture in the same sequence. In my case, I actually do have eyebrown_n.dds in Data\textures\actors\character\eyes, courtesy of "Improved Eyes Skyrim" mod. However, it is one of the vanilla files being (in my case) overloaded by a mod. If you look at included picture, only the main (diffuse) texture of the eyes is an add-on from a mod. The rest reference game native files. So, how to you handle packaging it? Let's say this head .nif will be a follower named Daniella. In my SSE\Data, I go to textures\actors\character, and there I create a 'Daniella' folder, and under it I create 'eyes' folder. First, the diffuse texture. It comes from a mod called 'Tullius Eyes pack' which is non-Nexus mod, and does not have any restriction on resource inclusion. I copy the N510.dds from textures\actors\character\V5 to textures\actors\character\Daniella\eyes, and I change its path in the .nif accordingly (actors\character\Daniella\eyes\N50.dds) Next up, the normal map (eyebrown_n.dds) It is one of the vanilla textures. If you don't actually have textures\actors\character\eyes\eyebrown_n.dds file under your game Data folder, then you leave the .nif texture path as is, and you do NOT package this texture with your mod. It will just use vanilla. However, lets say you do have a mod overloading this texture in your install. Then, you have two options, usually dependent on what sort of permissions are there on the source mod. Option 1: you leave the texture path in the .nif as is - referencing the vanilla file, but somewhere in your mod description, you indicate that you use an improved eye textures mod such as "Improved Eyes" Option 2: you copy the texture over to your mod's area (textures\actors\character\Daniella\eyes) and change the texture path in the .nif to reflect that.
- 1 reply
-
- 1
-

-
Just to get the obvious out of the way... After you are done talking to Mara and chosen your alt start, you are supposed to use the bed in the room to proceed. Only exception being the "I want out of this cell" option which spawns a few lockpicks on the table for you to pick the cell door with.
-
It could be same issue as with this one: Jane SE Whenever you try to set her outfit management to on in AFT, the game freezes. The issue is that she comes with 2 silver swords equipped, and those swords have a script to add a 'silver sword' perk when equipped and remove it when unequipped. And AFT rapidly removes and reequips all gear when switching outfit. So, at least with Jane, if you use the 'trade items' option, and take away her silver swords before trying to manage her outfits, everything works fine. So, the question is - does any of her default gear have scripts attached that potentially messes with perks? Cause that could be the issue.
-
SSE How to detect if item is enchanted?
scorrp10 replied to empbeef's topic in Skyrim's Creation Kit and Modders
Both Armor and Weapon classes have GetEnchantment() function. Though not sure if it is SKSE or not. -
[SE]A rollup of all the various head models
scorrp10 replied to anjenthedog's topic in Skyrim's Mod Ideas
No, that 'BoogityBoo Head mesh' is still either vanilla or HighPoly head that has been custom sculpted by that specific preset creator. Sliders can only get you so far, so if you do any advanced shaping of the head in the sculpt section, you need to export the resulting mesh and include it with the preset. So, if a preset requires a 'BoogityBoo' head mesh to work, and preset creator has neglected to include it with the preset, I am afraid the only place it can be found is on that preset creator's hard drive. -
[SE]A rollup of all the various head models
scorrp10 replied to anjenthedog's topic in Skyrim's Mod Ideas
There are really only two heads: vanilla and HP. So you don't need a 'library' - you generally just need the HP head installed. The big problem is that preset authors very very often fail to provide a full and proper list of all the mods they used in their preset. Which should include not only the mods providing the head parts, but also: Which skin was used and with what install options. All the various makeup and other texture overlays. Those can alter the look significantly, especially the 'shading/sculpting' overlays. Then the look in the screenshots massively depends on ENB, lighting mods installed, even the in-game location where the screenshots were taken. -
SSE How to use OnGetUp()
scorrp10 replied to dizietemblesssma's topic in Skyrim's Creation Kit and Modders
OnGetUp() event can be defined on an Actor object, or on an ActiveMagicEffect that has been applied to an Actor, or on a ReferenceAlias that aliases an Actor. -
Can I use more than one skin mod in one game?
scorrp10 replied to Gerkesiz's topic in Skyrim's Skyrim SE
I have, under textures, a skins folder, under which I keep a whole bunch of CBBE and UNP skins. One way to do it (at least with Vortex) is to download a skin mod, run the install step (FOMOD) to pick the options that interest you. Do NOT do Enable and Deploy steps. The skin files are now in the Vortex staging folder, I can just copy them from there to a place like Data\textures\skins\CBBE\Bijin And I keep a small master .esp with the texture sets pointing to those skin textures. Then if I want switch some NPC to a given skin, I can do that easily. -
Posting your mod list is really not going to do you much good cause it is not obvious from that which mods may overload Lydia. Get SSEEdit , install it and set it up, Here is my SSEEdit screenshot: It shows that Lydia's record is defined in Skyrim.esm, and overloaded by Unofficial Skyrim Special Edition Patch, Bijin Warmaidens, and WoSLK, the latter having top priority. Bijin and WoSLK both affect only the looks, so I can overload without issue, as long as WoSLK files have priority over Bijin. Once you know which mods overload Lydia, a fix can be worked out.
-
You need to install SSEEdit, load it up, expand Skyrim.esm - Non-Player Character - locate 000A2C8E - HousecarlWhiterun (Lydia) and click on it. See which mods are overloading her record and in what order. (left to right)
-
Yes. You make sure what is the weight of the NPC you making a head for. Then in Racemenu, be sure to set that weight before exporting the head.
-
Neck seam as in a gap, where head does not quite fit the body? Or seam as in color difference? A gap results when head is generated for a different weight than the body, either re-export the head with proper weight, or change the wight of body. A color difference means either head is using skin from a different mod from body, or head tint mask was exported with different skin tint than was finally used for the NPC.
-
https://github.com/niftools/nifskope/releases/tag/v2.0.dev7 The .7z file download link at the very bottom.
-
Get ConsoleUtilSSE Then you should be able to create spell effects that run scripts - utilizing ConsoleUtil calls. You will just need to specify ConsoleUtilSSE as requirement for your mod.
-
Consider this mod of mine It might help.